We've all seen those slightly dreary photo booths in community halls — a crumpled silver curtain, a touchscreen nobody quite knows how to use, and prints that get forgotten at the bottom of a bag. That's a shame, because a good wedding photo booth can be the most memorable part of the whole evening. And contrary to what people think, it takes neither a fortune nor an hour of assembly.
Here's how to do it properly, quickly, and without the headache.
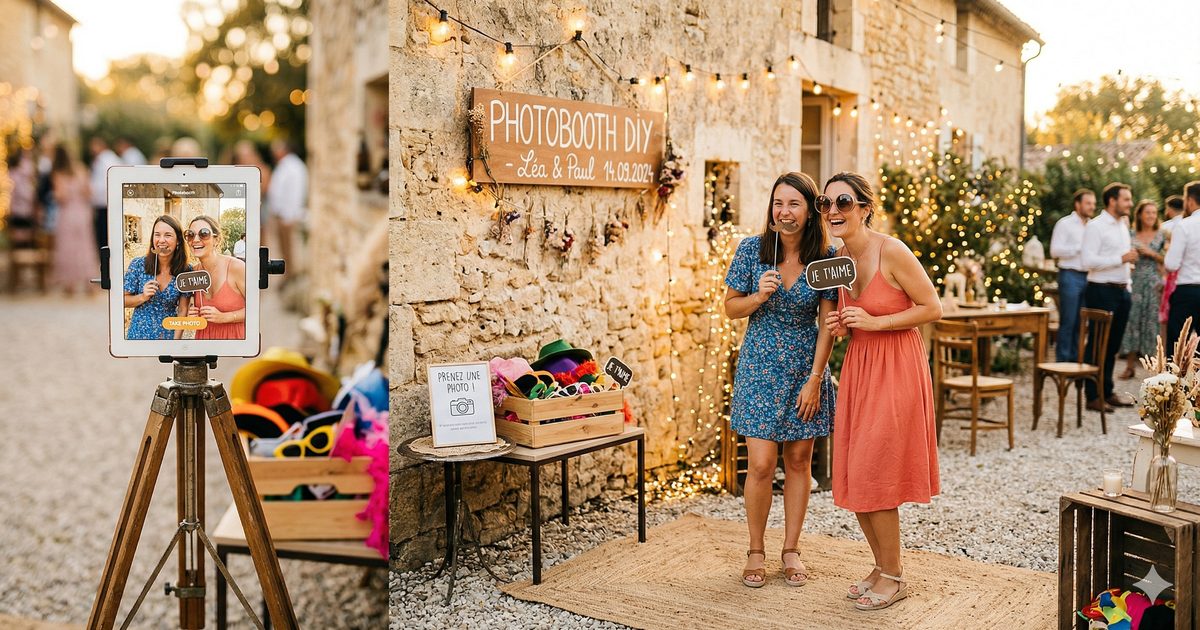
What you need (and nothing more)
The list is short. An iPad — or any recent tablet — a tripod, and an internet connection. That's it.
No need to buy €800 of specialist equipment, no need to rent a professional booth. The Tronche! app turns your tablet into a complete photo booth: selfies, a shared gallery, and a QR code so guests can grab their photos in real time. Simplicity really is the heart of the concept.
For the tripod, the ideal model is one that rises to standing eye level — around 1.5 m to 1.6 m. If you're unsure which one to get, I wrote a complete article on the best tripods for an iPad photo booth that compares several options based on your budget.
The question of the backdrop
A plain backdrop always looks better than a run-of-the-mill reception-hall wall. A few quick options:
A white or cream sheet stretched over a clothes rail. It takes three minutes to set up and looks very clean. A string of fairy lights hung in front of a dark wall. Guaranteed "party" effect — guests love it. An artificial greenery wall — it rents for next to nothing and gives photos a fresh, leafy feel.
That said, if the venue already has a beautiful stone wall, a bookcase, or some nice decor, you don't need to add a backdrop at all. Try it first with what you have.
Location: the most important decision
A lot of people put the photo booth in a quiet corner "so it won't get in the way." Classic mistake. A photo booth in a corner is a photo booth nobody uses.
The ideal spot is somewhere guests pass through naturally — near the bar, at the entrance to the reception area, or between the dance floor and the tables. Not right in the middle of the traffic, but visible and easy to reach.
Natural daylight is your best ally during the day. If the party runs on after dark, think about a small ring light. It costs €20–30 and radically changes photo quality — this 10-inch model with a built-in tripod does the job nicely for the price. Not mandatory, but if you want crisp photos at 11 p.m. with guests who've had a few drinks, it's genuinely useful. We've picked out the best ring lights and tripods in our shop.
To go further on this question, I've laid out the best locations for a wedding photo booth with concrete examples depending on the type of venue.
The setup itself
Stopwatch in hand, here's how it goes:
Minute 1–2: Unfold the tripod, set the height, attach the tablet. Most tripods have a universal mount that adapts in a few seconds. If your tripod has no tablet holder, a universal adapter costs under €15.
Minute 3: Open Tronche!, create your event or enter the code for your existing event. The app launches in kiosk mode automatically — guests can't accidentally exit the app.
Minute 4: Test the angle. Take a photo yourself to check the framing is right. Usually you'll need to tilt the tablet slightly downward if you've set it at standard height.
Minute 5: Display the sharing QR code next to the photo booth — printed or on a second screen. This is the QR code guests will scan to find their photos in the shared gallery.
There you go. It's ready.
What everyone forgets
The battery. If your tablet is plugged in, no problem. Otherwise, make sure it's fully charged before the evening begins — a wedding party easily runs 6 to 8 hours.
The Wi-Fi. Uploading photos to the shared gallery needs a decent connection. Check that the venue has Wi-Fi in the area where you're setting up the booth, or plan to tether from your phone. Over mobile data, it works just fine.
The props. Costume glasses, little "Just Married" signs, cardboard moustaches... none of it is mandatory at all, but if you put a little basket of them nearby, guests always grab them. It's social physics. We've listed our favourite props kits in the shop — expect €10–15 for a complete set.
And if something goes wrong?
Trust me, in 95% of cases, nothing goes wrong. But if the app crashes, just relaunch it — the photos are saved. If the tripod tips over (it happens, with slightly over-enthusiastic guests), an iPad in its case usually survives a 1.5 m fall just fine.
The only real risk is that nobody uses it because guests don't know it's there. So mention it during the reception drinks, put up a little sign, and ask a friend to get the ball rolling by taking the first few photos. Once it starts, it doesn't stop.
A well-placed wedding photo booth with a simple app like Tronche! is often the entertainment everyone talks about the next day. Not because it's complicated — precisely because it isn't.
This article contains Amazon affiliate links. Buying through these links supports Tronche! at no extra cost to you.